Directly Connect Two Nodes and Test Communicationqwifi Easy Integration With Ethernet
Last week, Microsoft announced the final release of Windows Server 2016 (the bits can be downloaded here). In addition, Microsoft has announced that Windows Server 2016 supports now a 2-node hyperconverged cluster configuration. I can now publish the setup of my lab configuration which is almost a production platform. Only SSD are not enterprise grade and one Xeon is missing per server. But to show you how it is easy to implement a hyperconverged solution it is fine. In this topic, I will show you how to deploy a 2-node hyperconverged cluster from the beginning with Windows Server 2016. But before running some PowerShell cmdlet, let's take a look on the design.
Design overview
In this part I'll talk about the implemented hardware and how are connected both nodes. Then I'll introduce the network design and the required software implementation.
Hardware consideration
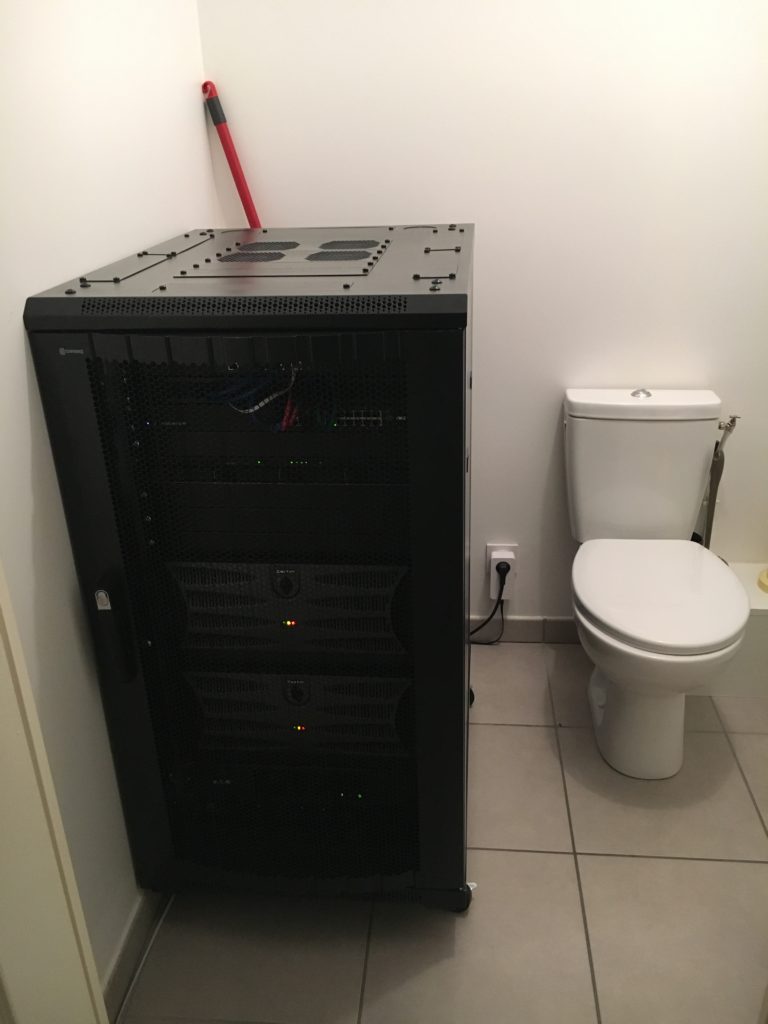
First of all, it is necessary to present you the design. I have bought two nodes that I have built myself. Both nodes are not provided by a manufacturer. Below you can find the hardware that I have implemented in each node:
- CPU: Xeon 2620v2
- Motherboard: Asus Z9PA-U8 with ASMB6-iKVM for KVM-over-Internet (Baseboard Management Controller)
- PSU: Fortron 350W FSP FSP350-60GHC
- Case: Dexlan 4U IPC-E450
- RAM: 128GB DDR3 registered ECC
-
Storage devices:
- 1x Intel SSD 530 128GB for the Operating System
- 1x Samsung NVMe SSD 950 Pro 256GB (Storage Spaces Direct cache)
- 4x Samsung SATA SSD 850 EVO 500GB (Storage Spaces Direct capacity)
-
Network Adapters:
- 1x Intel 82574L 1GB for VM workloads (two controllers). Integrated to motherboard
- 1x Mellanox Connectx3-Pro 10GB for storage and live-migration workloads (two controllers). Mellanox are connected with two passive copper cables with SFP provided by Mellanox
- 1x Switch Ubiquiti ES-24-Lite 1GB
If I were in production, I'd replace SSD by enterprise grade SSD and I'd add a NVMe SSD for the caching. To finish I'd buy server with two Xeon. Below you can find the hardware implementation.

Network design
To support this configuration, I have created five network subnets:
- Management network: 10.10.0.0/24 – VID 10 (Native VLAN). This network is used for Active Directory, management through RDS or PowerShell and so on. Fabric VMs will be also connected to this subnet.
- DMZ network: 10.10.10.0/24 – VID 11. This network is used by DMZ VMs as web servers, AD FS etc.
- Cluster network: 10.10.100/24 – VID 100. This is the cluster heart beating network
- Storage01 network: 10.10.101/24 – VID 101. This is the first storage network. It is used for SMB 3.11 transaction and for Live-Migration.
- Storage02 network: 10.10.102/24 – VID 102. This is the second storage network. It is used for SMB 3.11 transaction and for Live-Migration.
I can't leverage Simplified SMB MultiChannel because I don't have a 10GB switch. So each 10GB controller must belong to separate subnets.
I will deploy a Switch Embedded Teaming for 1GB network adapters. I will not implement a Switch Embedded Teaming for 10GB because a switch is missing.
Logical design
I will have two nodes called pyhyv01 and pyhyv02 (Physical Hyper-V).
The first challenge concerns the failover cluster. Because I have no other physical server, the domain controllers will be virtual. if I implement domain controllers VM in the cluster, how can start the cluster? So the DC VMs must not be in the cluster and must be stored locally. To support high availability, both nodes will host a domain controller locally in the system volume (C:\). In this way, the node boot, the DC VM start and then the failover cluster can start.
Both nodes are deployed in core mode because I really don't like graphical user interface for hypervisors. I don't deploy the Nano Server because I don't like the Current Branch for Business model for Hyper-V and storage usage. The following feature will be deployed for both nodes:
- Hyper-V + PowerShell management tools
- Failover Cluster + PowerShell management tools
- Storage Replica (this is optional, only if you need the storage replica feature)

The storage configuration will be easy: I'll create a unique Storage Pool with all SATA and NVMe SSD. Then I will create two Cluster Shared Volumes that will be distributed across both nodes. The CSV will be called CSV-01 and CSV-02.
Operating system configuration
I show how to configure a single node. You have to repeat these operations for the second node in the same way. This is why I recommend you to make a script with the commands: the script will help to avoid human errors.
Bios configuration
The bios may change regarding the manufacturer and the motherboard. But I always do the same things in each server:
- Check if the server boot in UEFI
- Enable virtualization technologies as VT-d, VT-x, SLAT and so on
- Configure the server in high performance (in order that CPUs have the maximum frequency available)
- Enable HyperThreading
- Disable all unwanted hardware (audio card, serial/com port and so on)
- Disable PXE boot on unwanted network adapters to speed up the boot of the server
- Set the date/time
Next I check if the memory is seen, and all storage devices are plugged. When I have time, I run a memtest on server to validate hardware.
OS first settings
I have deployed my nodes from a USB stick configured with Easy2Boot. Once the system is installed, I have deployed drivers for motherboard and for Mellanox network adapters. Because I can't connect with a remote MMC to Device Manager, I use the following commands to list if drivers are installed:
gwmi Win32_SystemDriver | select name,@{n="version";e={(gi $_.pathname).VersionInfo.FileVersion}} gwmi Win32_PnPSignedDriver | select devicename,driverversion 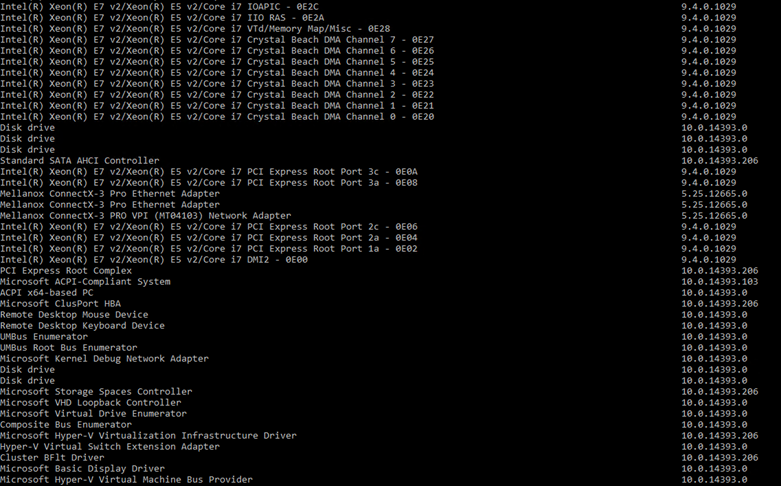
After all drivers are installed, I configure the server name, the updates, the remote connection and so on. For this, I use sconfig.
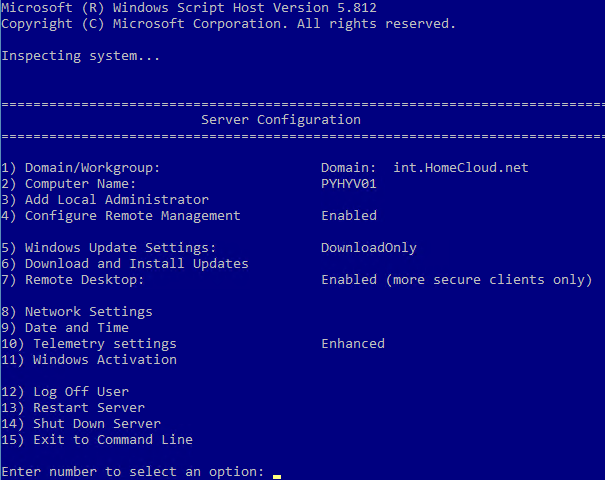
This tool is easy, but don't provide automation. You can do the same thing with PowerShell cmdlet, but I have only two nodes to deploy and I find this easier. All you have to do, is to move in menu and set parameters. Here I have changed the computer name, I have enabled the remote desktop and I have downloaded and installed all updates. I heavily recommend you to install all updates before deploying the Storage Spaces Direct.
Then I configure the power options to "performance" by using the bellow cmdlet:
POWERCFG.EXE /S SCHEME_MIN
Once the configuration is finished, you can install the required roles and features. You can run the following cmdlet on both nodes:
Install-WindowsFeature Hyper-V, Data-Center-Bridging, Failover-Clustering, RSAT-Clustering-Powershell, Hyper-V-PowerShell, Storage-Replica
Once you have run this cmdlet the following roles and features are deployed:
- Hyper-V + PowerShell module
- Datacenter Bridging
- Failover Clustering + PowerShell module
- Storage Replica
Network settings
Once the OS configuration is finished, you can configure the network. First, I rename network adapters as below:
get-netadapter |? Name -notlike vEthernet* |? InterfaceDescription -like Mellanox*#2 | Rename-NetAdapter -NewName Storage-101 get-netadapter |? Name -notlike vEthernet* |? InterfaceDescription -like Mellanox*Adapter | Rename-NetAdapter -NewName Storage-102 get-netadapter |? Name -notlike vEthernet* |? InterfaceDescription -like Intel*#2 | Rename-NetAdapter -NewName Management01-0 get-netadapter |? Name -notlike vEthernet* |? InterfaceDescription -like Intel*Connection | Rename-NetAdapter -NewName Management02-0

Next I create the Switch Embedded Teaming with both 1GB network adapters called SW-1G:
New-VMSwitch -Name SW-1G -NetAdapterName Management01-0, Management02-0 -EnableEmbeddedTeaming $True -AllowManagementOS $False
Now we can create two virtual network adapters for the management and the heartbeat:
Add-VMNetworkAdapter -SwitchName SW-1G -ManagementOS -Name Management-0 Add-VMNetworkAdapter -SwitchName SW-1G -ManagementOS -Name Cluster-100

Then I configure VLAN on vNIC and on storage NIC:
Set-VMNetworkAdapterVLAN -ManagementOS -VMNetworkAdapterName Cluster-100 -Access -VlanId 100 Set-NetAdapter -Name Storage-101 -VlanID 101 -Confirm:$False Set-NetAdapter -Name Storage-102 -VlanID 102 -Confirm:$False
Below screenshot shows the VLAN configuration on physical and virtual adapters.


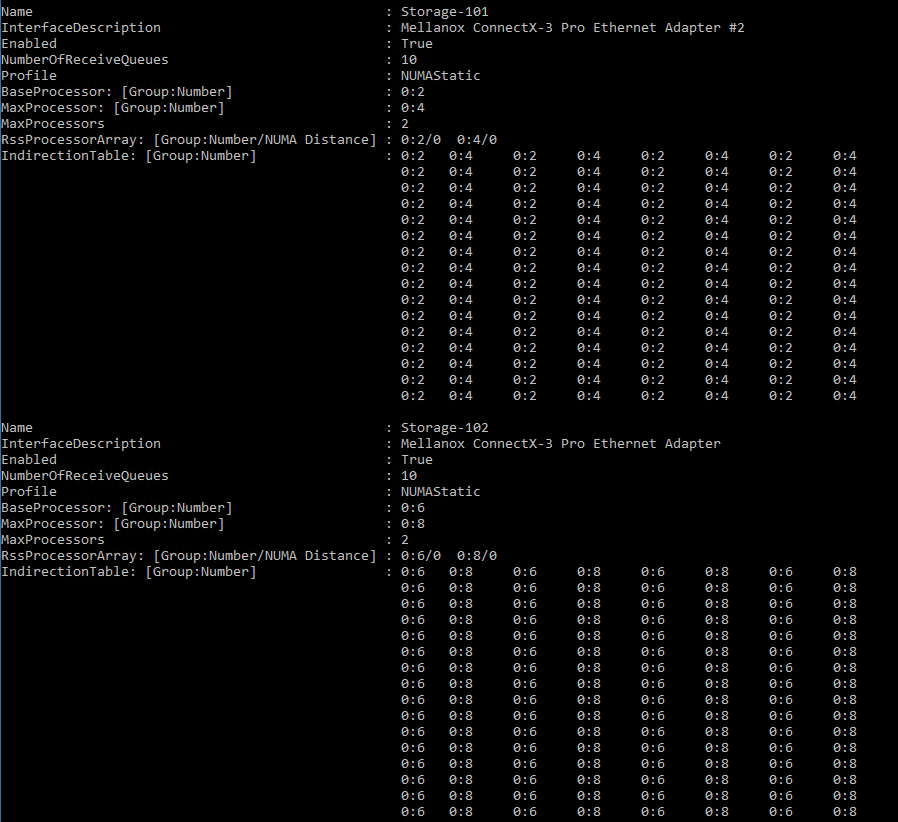
Next I disable VM queue (VMQ) on 1GB network adapters and I set it on 10GB network adapters. When I set the VMQ, I use multiple of 2 because hyperthreading is enabled. I start with a base processor number of 2 because it is recommended to leave the first core (core 0) for other processes.
Disable-NetAdapterVMQ -Name Management* # Core 1, 2 & 3 will be used for network traffic on Storage-101 Set-NetAdapterRSS Storage-101 -BaseProcessorNumber 2 -MaxProcessors 2 -MaxProcessorNumber 4 #Core 4 & 5 will be used for network traffic on Storage-102 Set-NetAdapterRSS Storage-102 -BaseProcessorNumber 6 -MaxProcessors 2 -MaxProcessorNumber 8
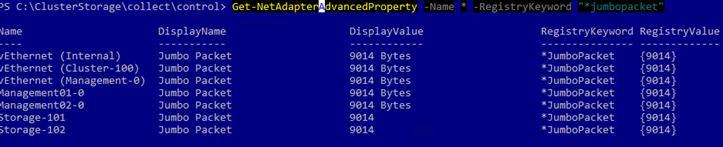
Next I configure Jumbo Frame on each network adapter.
Get-NetAdapterAdvancedProperty -Name * -RegistryKeyword "*jumbopacket" | Set-NetAdapterAdvancedProperty -RegistryValue 9014
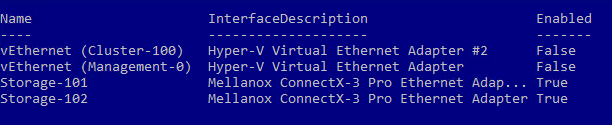
Now we can enable RDMA on storage NICs:
Get-NetAdapter *Storage* | Enable-NetAdapterRDMA
The below screenshot is the result of Get-NetAdapterRDMA.
Even if it is useless because I have no switch and other connections on 10GB network adapters, I configure DCB:
# Turn on DCB Install-WindowsFeature Data-Center-Bridging # Set a policy for SMB-Direct New-NetQosPolicy "SMB" -NetDirectPortMatchCondition 445 -PriorityValue8021Action 3 # Turn on Flow Control for SMB Enable-NetQosFlowControl -Priority 3 # Make sure flow control is off for other traffic Disable-NetQosFlowControl -Priority 0,1,2,4,5,6,7 # Apply policy to the target adapters Enable-NetAdapterQos -InterfaceAlias "Storage-101" Enable-NetAdapterQos -InterfaceAlias "Storage-102" # Give SMB Direct 30% of the bandwidth minimum New-NetQosTrafficClass "SMB" -Priority 3 -BandwidthPercentage 30 -Algorithm ETS
Ok, now that network adapters are configured, we can configure IP addresses and try the communication on the network.
New-NetIPAddress -InterfaceAlias "vEthernet (Management-0)" -IPAddress 10.10.0.5 -PrefixLength 24 -DefaultGateway 10.10.0.1 -Type Unicast | Out-Null Set-DnsClientServerAddress -InterfaceAlias "vEthernet (Management-0)" -ServerAddresses 10.10.0.20 | Out-Null New-NetIPAddress -InterfaceAlias "vEthernet (Cluster-100)" -IPAddress 10.10.100.5 -PrefixLength 24 -Type Unicast | Out-Null New-NetIPAddress -InterfaceAlias "Storage-101" -IPAddress 10.10.101.5 -PrefixLength 24 -Type Unicast | Out-Null New-NetIPAddress -InterfaceAlias "Storage-102" -IPAddress 10.10.102.5 -PrefixLength 24 -Type Unicast | Out-Null #Disable DNS registration of Storage and Cluster network adapter (Thanks to Philip Elder :)) Set-DNSClient -InterfaceAlias Storage* -RegisterThisConnectionsAddress $False Set-DNSClient -InterfaceAlias *Cluster* -RegisterThisConnectionsAddress $False

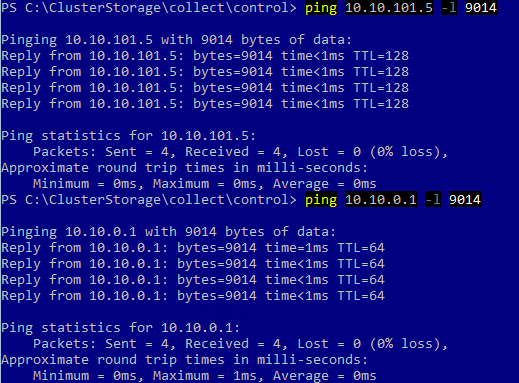
Then I try the Jumbo Frame: it is working.
Now my nodes can communicate with other friends through the network. Once you have reproduced these steps on the second node, we can deploy the domain controller.
Connect to Hyper-V remotely
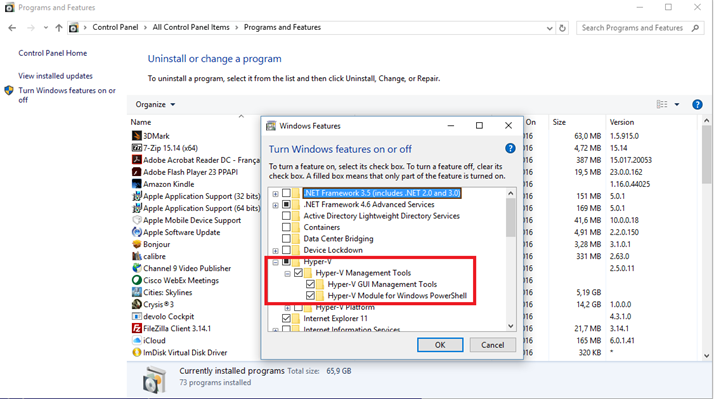
To make future actions, I work from my laptop with remote PowerShell. To display the Hyper-V VM consoles, I have installed RSAT on my Windows 10. Then I have installed the Hyper-V console:
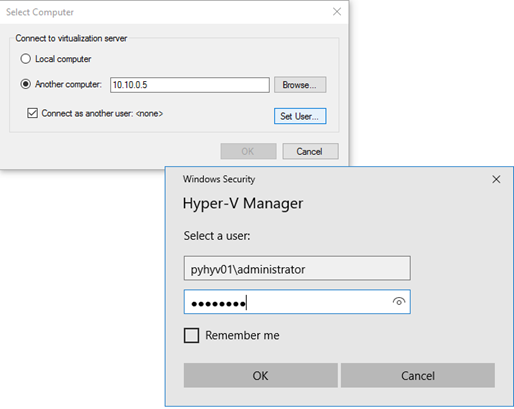
Before being able to connect to Hyper-V remotely, some configurations are required from the server and client perspectives. In both nodes, run the following cmdlets:
Enable-WSManCredSSP -Role server
In your laptop, run the following cmdlets (replace fqdn-of-hyper-v-host by the future Hyper-V hosts FQDN):
Set-Item WSMan:\localhost\Client\TrustedHosts -Value "10.10.0.5" Set-Item WSMan:\localhost\Client\TrustedHosts -Value "fqdn-of-hyper-v-host" Set-Item WSMan:\localhost\Client\TrustedHosts -Value "10.10.0.6" Set-Item WSMan:\localhost\Client\TrustedHosts -Value "fqdn-of-hyper-v-host" Enable-WSManCredSSP -Role client -DelegateComputer "10.10.0.5" Enable-WSManCredSSP -Role client -DelegateComputer "fqdn-of-hyper-v-host" Enable-WSManCredSSP -Role client -DelegateComputer "10.10.0.6" Enable-WSManCredSSP -Role client -DelegateComputer "fqdn-of-hyper-v-host"
Then, run gpedit.msc and configure the following policy:
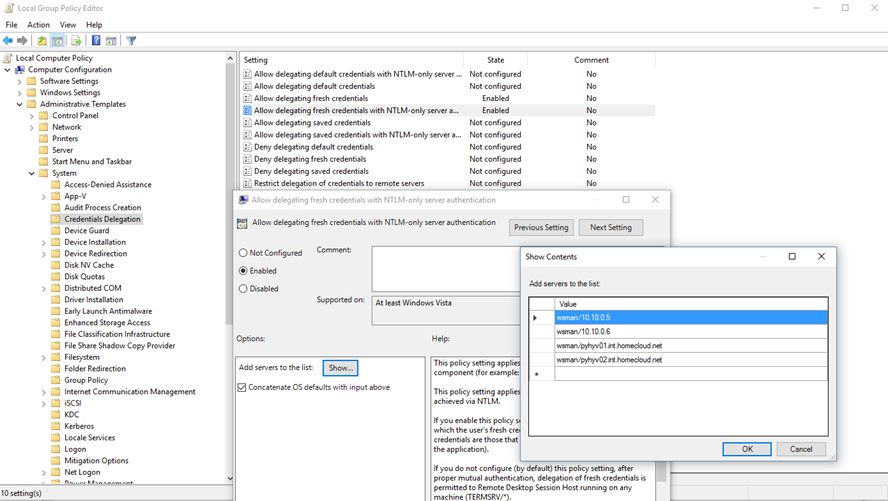
Now you can leverage the new Hyper-V manager capability which enable to use an alternative credential to connect to Hyper-V.
Domain controller deployment
Before deploying the VM, I have copied the Windows Server 2016 ISO in c:\temp of both nodes. Then I have run the following script from my laptop:
# Create the first DC VM Enter-PSSession -ComputerName 10.10.0.5 -Credential pyhyv01\administrator $VMName = "VMADS01" # Create Gen 2 VM with dynamic memory, autostart action to 0s and auto stop action set. 2vCPU New-VM -Generation 2 -Name $VMName -SwitchName SW-1G -NoVHD -MemoryStartupBytes 2048MB -Path C:\VirtualMachines Set-VM -Name $VMName -ProcessorCount 2 -DynamicMemory -MemoryMinimumBytes 1024MB -MemoryMaximumBytes 4096MB -MemoryStartupBytes 2048MB -AutomaticStartAction Start -AutomaticStopAction ShutDown -AutomaticStartDelay 0 -AutomaticCriticalErrorAction None -CheckpointType Production # Create and add a 60GB dynamic VHDX to the VM New-VHD -Path C:\VirtualMachines\$VMName\W2016-STD-1.0.vhdx -SizeBytes 60GB -Dynamic Add-VMHardDiskDrive -VMName $VMName -Path C:\VirtualMachines\$VMName\W2016-STD-1.0.vhdx # Rename the network adapter Get-VMNetworkAdapter -VMName $VMName | Rename-VMNetworkAdapter -NewName Management-0 # Add a DVD drive with W2016 ISO Add-VMDvdDrive -VMName $VMName Set-VMDvdDrive -VMName $VMName -Path C:\temp\14393.0.160715-1616.RS1_RELEASE_SERVER_EVAL_X64FRE_EN-US.ISO # Set the DVD drive as first boot $VD = Get-VMHardDiskDrive -VMName $VMName -ControllerNumber 0 -ControllerLocation 1 Set-VMFirmware -VMName $VMName -FirstBootDevice $VD # Add a data disk to the VM (10GB dynamic) New-VHD -Path C:\VirtualMachines\$VMName\data.vhdx -SizeBytes 10GB -Dynamic Add-VMHardDiskDrive -VMName $VMName -Path C:\VirtualMachines\$VMName\Data.vhdx # Start the VM Start-VM Exit # Create the second DC VM with the same capabilities as below Enter-PSSession -ComputerName 10.10.0.6 -Credential pyhyv02\administrator $VMName = "VMADS02" New-VM -Generation 2 -Name $VMName -SwitchName SW-1G -NoVHD -MemoryStartupBytes 2048MB -Path C:\VirtualMachines Set-VM -Name $VMName -ProcessorCount 2 -DynamicMemory -MemoryMinimumBytes 1024MB -MemoryMaximumBytes 4096MB -MemoryStartupBytes 2048MB -AutomaticStartAction Start -AutomaticStopAction ShutDown -AutomaticStartDelay 0 -AutomaticCriticalErrorAction None -CheckpointType Production New-VHD -Path C:\VirtualMachines\$VMName\W2016-STD-1.0.vhdx -SizeBytes 60GB -Dynamic Add-VMHardDiskDrive -VMName $VMName -Path C:\VirtualMachines\$VMName\W2016-STD-1.0.vhdx Get-VMNetworkAdapter -VMName $VMName | Rename-VMNetworkAdapter -NewName Management-0 Add-VMDvdDrive -VMName $VMName Set-VMDvdDrive -VMName $VMName -Path C:\temp\14393.0.160715-1616.RS1_RELEASE_SERVER_EVAL_X64FRE_EN-US.ISO $VD = Get-VMHardDiskDrive -VMName $VMName -ControllerNumber 0 -ControllerLocation 1 Set-VMFirmware -VMName $VMName -FirstBootDevice $VD New-VHD -Path C:\VirtualMachines\$VMName\data.vhdx -SizeBytes 10GB -Dynamic Add-VMHardDiskDrive -VMName $VMName -Path C:\VirtualMachines\$VMName\Data.vhdx Start-VM Exit
Deploy the first domain controller
Once the VMs are created, you can connect to their consoles from Hyper-V manager to install the OS. A better way is to use a sysprep'd image. But because it is a "from scratch" infrastructure, I don't have a gold master. By using sconfig, you can install updates and enable Remote Desktop. Once the operating systems are deployed, you can connect to the VM across PowerShell Direct.
Below you can find the configuration of the first domain controller:
# Remote connection to first node Enter-PSSession -ComputerName 10.10.0.5 -Credential pyhyv01\administrator # Establish a PowerShell direct session to VMADS01 Enter-PSSession -VMName VMADS01 -Credential VMADS01\administrator # Rename network adapter Rename-NetAdapter -Name Ethernet -NewName Management-0 # Set IP Addresses New-NetIPAddress -InterfaceAlias "Management-0" -IPAddress 10.10.0.20 -PrefixLength 24 -Type Unicast | Out-Null # Set the DNS (this IP is my DNS server for internet in my lab) Set-DnsClientServerAddress -InterfaceAlias "Management-0" -ServerAddresses 10.10.0.229 | Out-Null # Initialize and mount the data disk initialize-disk -Number 1 New-Volume -DiskNumber 1 -FileSystem NTFS -FriendlyName Data -DriveLetter E # Install required feature install-WindowsFeature AD-Domain-Services, DNS -IncludeManagementTools # Deploy the forest Import-Module ADDSDeployment Install-ADDSForest ` -CreateDnsDelegation:$false ` -DatabasePath "E:\NTDS" ` -DomainMode "WinThreshold" ` #should be soon Win2016 -DomainName "int.HomeCloud.net" ` -DomainNetbiosName "INTHOMECLOUD" ` -ForestMode "WinThreshold" ` #should be soon Win2016 -InstallDns:$true ` -LogPath "E:\NTDS" ` -NoRebootOnCompletion:$false ` -SysvolPath "E:\SYSVOL" ` -Force:$true
Promote the second domain controller
Once the first domain controller is deployed and the forest is ready, you can promote the second domain controller:
Enter-PSSession -ComputerName 10.10.0.6 -Credential pyhyv02\administrator # Establish a PowerShell direct session to VMADS02 Enter-PSSession -VMName VMADS02 -Credential VMADS02\administrator # Rename network adapter Rename-NetAdapter -Name Ethernet -NewName Management-0 # Set IP Addresses New-NetIPAddress -InterfaceAlias "Management-0" -IPAddress 10.10.0.21 -PrefixLength 24 -Type Unicast | Out-Null # Set the DNS to the first DC Set-DnsClientServerAddress -InterfaceAlias "Management-0" -ServerAddresses 10.10.0.20 | Out-Null # Initialize and mount the data disk initialize-disk -Number 1 New-Volume -DiskNumber 1 -FileSystem NTFS -FriendlyName Data -DriveLetter E # Install required feature install-WindowsFeature AD-Domain-Services, DNS -IncludeManagementTools # Deploy the forest Import-Module ADDSDeployment Install-ADDSDomainController ` -NoGlobalCatalog:$false ` -CreateDnsDelegation:$false ` -Credential (Get-Credential) ` -CriticalReplicationOnly:$false ` -DatabasePath "E:\NTDS" ` -DomainName "int.HomeCloud.net" ` -InstallDns:$true ` -LogPath "E:\NTDS" ` -NoRebootOnCompletion:$false ` -SiteName "Default-First-Site-Name" ` -SysvolPath "E:\SYSVOL" ` -Force:$true
Configure the directory
Once the second server has rebooted, we can configure the directory has below:
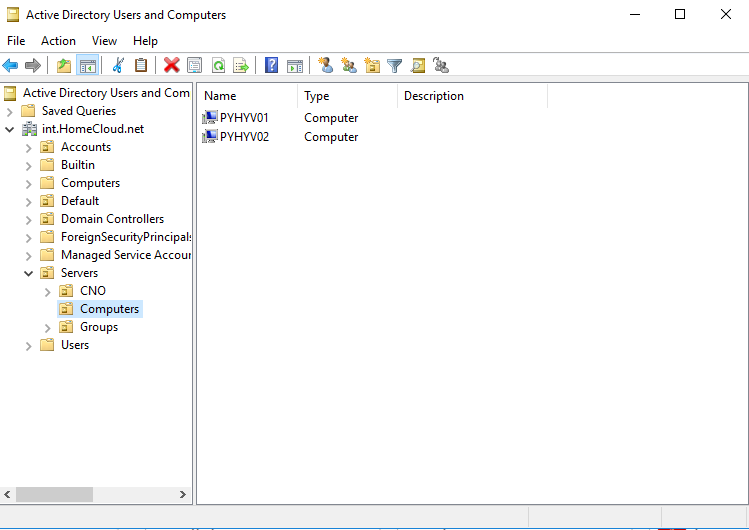
Enter-PSSession -computername VMADS01.int.homecloud.net #Requires -version 4.0 $DN = "DC=int,DC=HomeCloud,DC=net" # New Default OU New-ADOrganizationalUnit -Name "Default" -Path $DN $DefaultDN = "OU=Default,$DN" New-ADOrganizationalUnit -Name "Computers" -Path $DefaultDN New-ADOrganizationalUnit -Name "Users" -Path $DefaultDN # Redir container to OU cmd /c redircmp "OU=Computers,OU=Default,$DN" cmd /c redirusr "OU=Users,OU=Default,$DN" # Create Accounts tree New-ADOrganizationalUnit -Name "Accounts" -Path $DN $AccountOU = "OU=Accounts,$DN" New-ADOrganizationalUnit -Name "Users" -Path $AccountOU New-ADOrganizationalUnit -Name "Groups" -Path $AccountOU New-ADOrganizationalUnit -Name "Services" -Path $AccountOU # Create Servers tree New-ADOrganizationalUnit -Name "Servers" -Path $DN $ServersOU = "OU=Servers,$DN" New-ADOrganizationalUnit -Name "Computers" -Path $ServersOU New-ADOrganizationalUnit -Name "Groups" -Path $ServersOU New-ADOrganizationalUnit -Name "CNO" -Path $ServersOU # New User's groups $GroupAcctOU = "OU=Groups,$AccountOU" New-ADGroup -Name "GG-FabricAdmins" -Path $GroupAcctOU -GroupScope DomainLocal -Description "Fabric Server's administrators" New-ADGroup -Name "GG-SQLAdmins" -Path $GroupAcctOU -GroupScope DomainLocal -Description "SQL Database's administrators" # New Computer's groups $GroupCMPOU = "OU=Groups,$ServersOU" New-ADGroup -Name "GG-Hyperv" -Path $GroupCMPOU -GroupScope DomainLocal -Description "Hyper-V Servers" New-ADGroup -Name "GG-FabricServers" -Path $GroupCMPOU -GroupScope DomainLocal -Description "Fabric servers" New-ADGroup -Name "GG-SQLServers" -Path $GroupCMPOU -GroupScope DomainLocal -Description "SQL Servers" Exit
Ok, our Active Directory is ready, we can now add Hyper-V nodes to the domain 🙂
Add nodes to domain
To add both nodes to the domain, I run the following cmdlets from my laptop:
Enter-PSSession -ComputerName 10.10.0.5 -Credential pyhyv01\administrator $domain = "int.homecloud.net" $password = "P@$$w0rd" | ConvertTo-SecureString -asPlainText -Force $username = "$domain\administrator" $credential = New-Object System.Management.Automation.PSCredential($username,$password) Add-Computer -DomainName $domain -Credential $credential -OUPath "OU=Computers,OU=Servers,DC=int,DC=HomeCloud,DC=net" -Restart
Wait that pyhyv01 has rebooted and run the following cmdlet on pyhyv02. Now you can log on on pyhyv01 and pyhyv02 with domain credential. You can install Domain Services RSAT on the laptop to parse the Active Directory.
2-node hyperconverged cluster deployment
Now that the Active Directory is available, we can deploy the cluster. First, I test the cluster to verify that all is ok:
Enter-PSSession -ComputerName pyhyv01.int.homecloud.net -credential inthomecloud\administrator Test-Cluster pyhyv01, pyhyv02 -Include "Storage Spaces Direct",Inventory,Network,"System Configuration"
Check the report if they are issues with the configuration. If the report is good, run the following cmdlets:
# Create the cluster New-Cluster -Name Cluster-Hyv01 -Node pyhyv01,pyhyv02 -NoStorage -StaticAddress 10.10.0.10
Once the cluster is created, I set a Cloud Witness in order that Azure has a vote for the quorum.
# Add a cloud Witness (require Microsoft Azure account) Set-ClusterQuorum -CloudWitness -Cluster Cluster-Hyv01 -AccountName "<StorageAccount>" -AccessKey "<AccessKey>"
Then I configure the network name in the cluster:
#Configure network name (Get-ClusterNetwork -Name "Cluster Network 1").Name="Storage-102" (Get-ClusterNetwork -Name "Cluster Network 2").Name="Storage-101" (Get-ClusterNetwork -Name "Cluster Network 3").Name="Cluster-100" (Get-ClusterNetwork -Name "Cluster Network 4").Name="Management-0"
Next I configure the Node Fairness to run each time a node is added to the cluster and every 30mn. When the CPU of a node will be utilized at 70%, the node fairness will balance the VM across other nodes.
# Configure Node Fairness (Get-Cluster).AutoBalancerMode = 2 (Get-Cluster).AutoBalancerLevel = 2
Then I configure the Fault Domain Awareness to have a fault tolerance based on rack. It is useless in this configuration, but if you add nodes to the cluster, it can be useful. I enable this because it is recommended to make this configuration before enabling Storage Spaces Direct.
# Configure the Fault Domain Awareness New-ClusterFaultDomain -Type Site -Name "Lyon" New-ClusterFaultDomain -Type Rack -Name "Rack-22U-01" New-ClusterFaultDomain -Type Rack -Name "Rack-22U-02" New-ClusterFaultDomain -Type Chassis -Name "Chassis-Fabric-01" New-ClusterFaultDomain -Type Chassis -Name "Chassis-Fabric-02" Set-ClusterFaultDomain -Name Lyon -Location "France, Lyon 8e" Set-ClusterFaultDomain -Name Rack-22U-01 -Parent Lyon Set-ClusterFaultDomain -Name Rack-22U-02 -Parent Lyon Set-ClusterFaultDomain -Name Chassis-Fabric-01 -Parent Rack-22U-01 Set-ClusterFaultDomain -Name Chassis-Fabric-02 -Parent Rack-22U-02 Set-ClusterFaultDomain -Name pyhyv01 -Parent Chassis-Fabric-01 Set-ClusterFaultDomain -Name pyhyv02 -Parent Chassis-Fabric-02
To finish with the cluster, we have to enable Storage Spaces Direct, and create volume. But before, I run the following script to clean up disks:
icm (Get-Cluster -Name Cluster-Hyv01 | Get-ClusterNode) { Update-StorageProviderCache Get-StoragePool |? IsPrimordial -eq $false | Set-StoragePool -IsReadOnly:$false -ErrorAction SilentlyContinue Get-StoragePool |? IsPrimordial -eq $false | Get-VirtualDisk | Remove-VirtualDisk -Confirm:$false -ErrorAction SilentlyContinue Get-PhysicalDisk | Reset-PhysicalDisk -ErrorAction SilentlyContinue Get-Disk |? Number -ne $null |? IsBoot -ne $true |? IsSystem -ne $true |? PartitionStyle -ne RAW |% { $_ | Set-Disk -isoffline:$false $_ | Set-Disk -isreadonly:$false $_ | Clear-Disk -RemoveData -RemoveOEM -Confirm:$false $_ | Set-Disk -isreadonly:$true $_ | Set-Disk -isoffline:$true } Get-Disk |? Number -ne $null |? IsBoot -ne $true |? IsSystem -ne $true |? PartitionStyle -eq RAW | Group -NoElement -Property FriendlyName } | Sort -Property PsComputerName,Count Now we can enable Storage Spaces Direct and create volumes:
Enable-ClusterStorageSpacesDirect New-Volume -StoragePoolFriendlyName "S2D*" -FriendlyName CSV-01 -FileSystem CSVFS_ReFS -Size 922GB New-Volume -StoragePoolFriendlyName "S2D*" -FriendlyName CSV-02 -FileSystem CSVFS_ReFS -Size 922GB
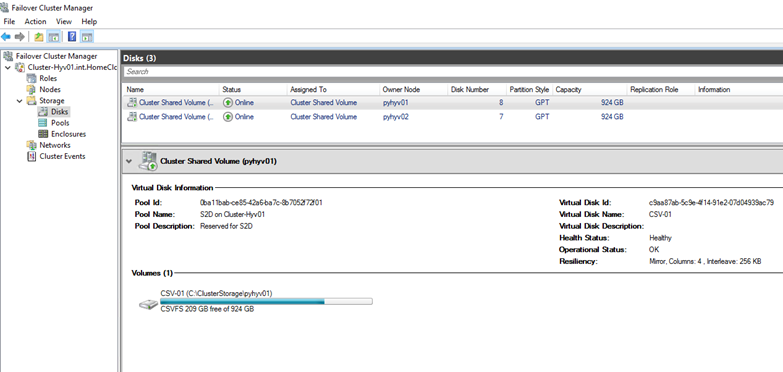
To finish I rename volume in c:\ClusterStorage by their names in the cluster:
Rename-Item -Path C:\ClusterStorage\volume1\ -NewName CSV-01 Rename-Item -Path C:\ClusterStorage\volume2\ -NewName CSV-02
Final Hyper-V configuration
First, I set default VM and virtual disk folders:
Set-VMHOST –computername pyhyv01 –virtualharddiskpath 'C:\ClusterStorage\CSV-01' Set-VMHOST –computername pyhyv01 –virtualmachinepath 'C:\ClusterStorage\CSV-01' Set-VMHOST –computername pyhyv02 –virtualharddiskpath 'C:\ClusterStorage\CSV-02' Set-VMHOST –computername pyhyv02 –virtualmachinepath 'C:\ClusterStorage\CSV-02'
Then I configure the Live-Migration protocol and the number of simultaneous migration allowed:
Enable-VMMigration –Computername pyhyv01, pyhyv02 Set-VMHost -MaximumVirtualMachineMigrations 4 ` –MaximumStorageMigrations 4 ` –VirtualMachineMigrationPerformanceOption SMB ` -ComputerName pyhyv01,pyhyv02
Next I add Kerberos delegation to configure Live-Migration in Kerberos mode:
Enter-PSSession -ComputerName VMADS01.int.homecloud.net $HyvHost = "pyhyv01" $Domain = "int.homecloud.net" Get-ADComputer pyhyv02 | Set-ADObject -Add @{"msDS-AllowedToDelegateTo"="Microsoft Virtual System Migration Service/$HyvHost.$Domain", "cifs/$HyvHost.$Domain","Microsoft Virtual System Migration Service/$HyvHost", "cifs/$HyvHost"} $HyvHost = "pyhyv02" Get-ADComputer pyhyv01 | Set-ADObject -Add @{"msDS-AllowedToDelegateTo"="Microsoft Virtual System Migration Service/$HyvHost.$Domain", "cifs/$HyvHost.$Domain","Microsoft Virtual System Migration Service/$HyvHost", "cifs/$HyvHost"} Exit Then I set authentication of Live-Migration to Kerberos.
Set-VMHost –Computername pyhyv01, pyhyv02 ` –VirtualMachineMigrationAuthenticationType Kerberos
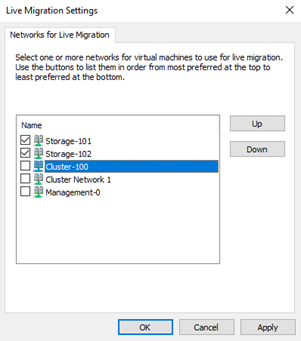
Next, I configure the Live-Migration network priority:
To finish I configure the cache size of the CSV to 512MB:
(Get-Cluster).BlockCacheSize = 512
Try a node failure
Now I'd like to shut down a node to verify if the cluster is always up. Let's see what happening if I shutdown a node:
As you have seen in the above video, even if I stop a node, the workloads still working. When the second node will be startup again, the virtual disks will enter in Regenerating state but you will be able to access to the data.
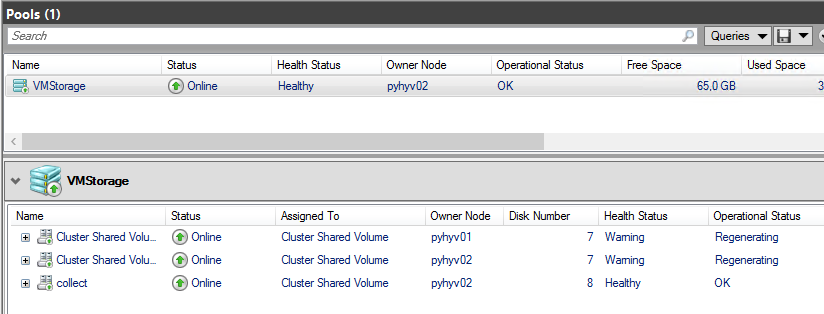
You can visualize the storage job with the below cmdlet:

Conclusion
2-node configuration is really a great scenario for small office or branch office. Without the cost of an expansive 10GB switch and a SAN, you can have high availability with Storage Spaces Direct. This kind of cluster is not really hard to deploy but I heavily recommend you to leverage PowerShell to make the implementation. Currently I'm working also on VMware vSAN and I can confirm you that Microsoft has a better solution in 2-nodes configuration. In vSAN scenario, you need a third ESX in a third room. In Microsoft environment, you need only a witness in another room as Microsoft Azure with Cloud Witness.
Source: https://tech-coffee.net/2-node-hyperconverged-cluster-with-windows-server-2016/
0 Response to "Directly Connect Two Nodes and Test Communicationqwifi Easy Integration With Ethernet"
Post a Comment